

Lately I have had an all encompassing need to up-cycle found or discarded objects, and transform them into interesting things for my home. Maybe it’s because stuff is just too damn expensive these days, but I have a sneaky suspicion that it goes a little deeper than that: As a 32 year old who has recently shed her obsession with CV building and left the corporate world, I have faced up to the fact that it is our right to do what we love, and love what we do. And so with this in mind I gave up marketing and returned to my Fine Art roots. Now, I am an Art Councilor in training because I have a strong belief that art has the power to heal! So perhaps my sudden need to REPURPOSE old objects is inextricably linked to my need to re-PURPOSE my life! Having done a 360-degree cycle in my choice of vocation, it can’t be a coincidence that I would have a strong need to find and re-CYCLE! Deep stuff aside- here is a guide to my latest revamp project:
MUSIC TO MY TIERS
For ages I have wanted a tiered biscuit stand – you know- for all that fancy entertaining that I never do- plan to do- but then don’t. That’s so beside the point because for this arty gal, the idea is inspiration enough for me. I have a habit of trawling second hand stores and charity shops. I find them to be a haven for cheap nick-nacks and inspiration. On a recent visit I spotted a cupboard filled with old vinyls. Victory! Perfect for my tiered biscuit stand. There has been many another that have also attempted this project, but here with what I did…
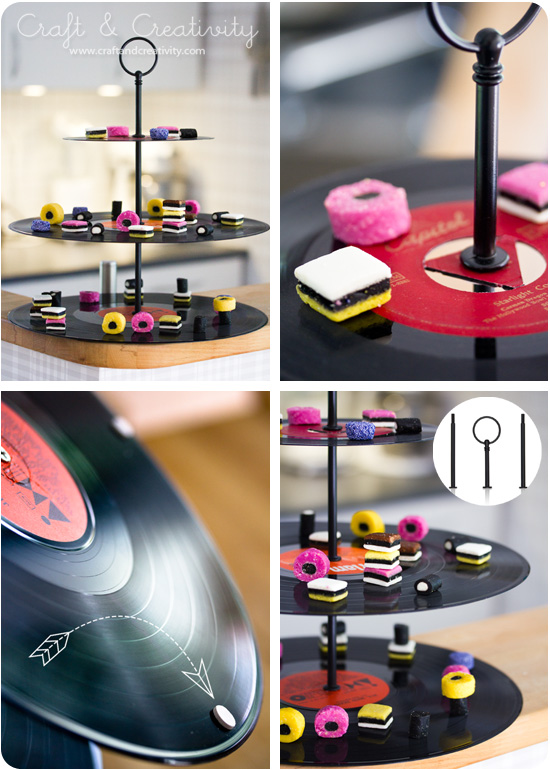
Image source: Craft & Creativity
So how did I do it? I am a whizz when it comes to making craft projects I find on Pinterest, armed with the motto “How hard can it be!?”. Where I fall short however, is that my handy man skills are confined to changing light bulbs, and hanging by Hilti. So I cheated…
You will need:
- A standard tiered biscuit tray, approx. R150
- 2-3 Vinyl records, approx. R5 each
- Quick drying spray paint, approx. R60
Steps to follow:
- As I did, buy a cheap cake stand.
- Dismantle the stand by unscrewing each section. This should be fairly easy as most stands are really just nuts-and-bolts attached to each other. (Check construction before you buy!).
- Next remove the trays.
- Spray paint the dismantled pieces in black so they match your vinyls.
- Select your records: either 2-3 different sizes or as in my case I used 2 of the same size for a larger surface area.
- Once the painted pieces are dry, you can replace the trays with your vinyls by inserting the rods through the centre holes of the records. Do this in the same order that you originally dismantled the stand. Tip: If you think you will forget how to put it back together, film yourself taking it apart (on your smart phone) so you have a reference when putting it back together.
- Now all you have to do is screw the pieces back into place.
- Presto! Your vinyl record stand is good to go for biscotti and bragging!
So it is as simple as that! Finding new uses for old things is such fun and so rewarding. My husband playfully teases me about my arty obsession with up-cycling and won’t so much as throw away an avocado peel without consulting me on whether or not I would like to use it in my next an art project. Challenge accepted!
Image source: theglassmagazine.com
Places to explore:
- Charity shop: 4th Ave, Melville JHB (hold onto your bag-ladies!)
- Flower spot, Woodmead Value Mart: For cake stands, containers and arts ‘n craft supplies galore.
- Milner Rd, Northcliff JHB: Amazing antique stores- can be pricy- but great for inspiration and one-of-a-kind pieces.

Image source: Pinterest
Need some help?
PINspirational craft classes: www.hartproject.tumblr.com
Thumbnail image by: Capture by Lucy
Let's get social
Instagram: @lovilee_zaTwitter: @lovilee_za
Facebook: @lovileeblog
or subscribe to never miss out on any new articles in this link.


Comments are closed.